Images make or break your WordPress site’s performance. They account for 50 to 80 percent of total page weight on most websites, and that bloated media directly tanks your Core Web Vitals scores. Google measures Largest Contentful Paint as a ranking signal, and guess what element typically triggers LCP? Your hero image, your featured post thumbnail, that banner you uploaded at 4000 pixels wide because it “looked sharper”. The math is brutal: every 100ms delay in load time costs you conversions.
The solution isn’t complicated, but most WordPress users get it wrong. They compress JPEGs until they look like abstract art, or they ignore image optimization entirely and wonder why their PageSpeed score hovers around 40. Modern image formats like WebP and AVIF exist specifically to solve this problem. They deliver dramatically smaller file sizes while maintaining visual quality that’s often indistinguishable from the original. WordPress 6.5 added native AVIF support, joining WebP support that arrived in version 5.8. The tools are built in. The question is which format you should actually use.
This article breaks down everything you need to know about WordPress image optimization using next-generation formats. You’ll understand the technical differences between WebP and AVIF, learn which format works best for different image types, and discover the exact plugins and workflows that will cut your page weight in half without sacrificing quality. I’ve tested dozens of configurations across real WordPress sites, and the results might surprise you. AVIF usually wins on compression, but WebP isn’t going anywhere. The smart approach uses both.
Whether you’re running a photography portfolio, an eCommerce store with thousands of product images using digital product solutions, or a simple blog with the occasional screenshot, image optimization directly affects your search rankings, user experience, and bottom line. A site that switched from JPEG to AVIF with WebP fallbacks saw LCP improve from 3.8 seconds to 1.9 seconds. That’s not a marginal gain, that’s the difference between passing and failing Core Web Vitals. Ready to stop guessing and start optimizing? Read on.
Why Image Format Matters More Than Ever in 2026

Google doesn’t care that your photography looks stunning at full resolution, the algorithm cares about speed. Largest Contentful Paint accounts for 25 percent of your overall PageSpeed Insights score, and images are the LCP element on most mobile pages. When someone visits your site on a 4G connection, that 2MB hero image becomes the bottleneck that determines whether they stay or bounce. Studies show 53 percent of mobile users abandon sites that take longer than 3 seconds to load.
The LCP threshold Google wants you to hit is 2.5 seconds or less. Miss that target and your page gets flagged as needing improvement. Go beyond 4 seconds and you fail outright. These aren’t arbitrary numbers either, Google derived them from user behavior data showing exactly where engagement drops off. And since Core Web Vitals became a ranking factor, the stakes are higher than ever. Your competitor with faster images ranks above you, even if your content is better.
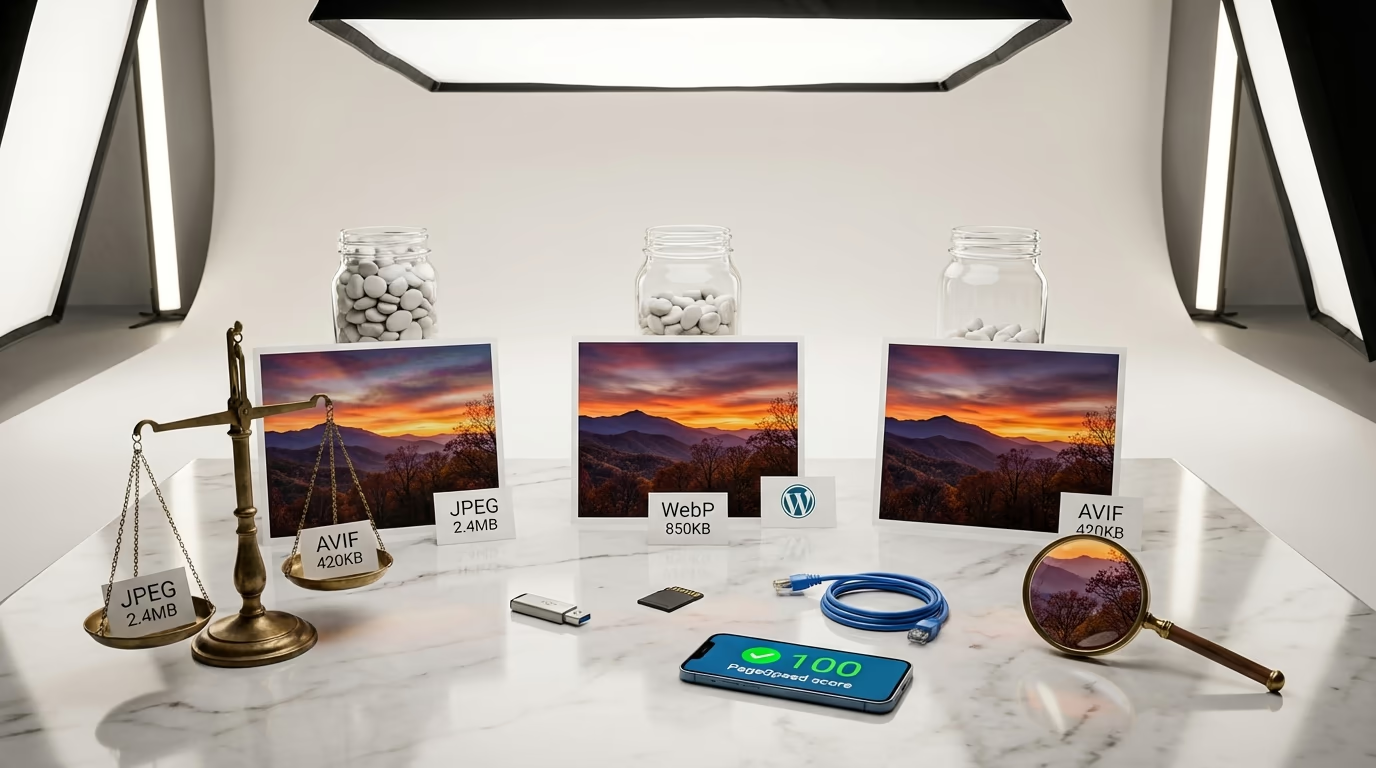
Traditional formats like JPEG and PNG were designed decades ago when dial-up modems were the norm and a 100KB image seemed enormous. JPEG compression creates visible artifacts at higher ratios, and PNG files balloon in size for complex images. WebP arrived in 2010 as Google’s answer to this problem, offering 30 percent smaller files than JPEG at equivalent quality. Then AVIF emerged in 2019, pushing compression even further. AVIF files typically weigh 50 percent less than WebP equivalents while maintaining better visual fidelity, especially in areas with smooth gradients and fine detail.
WordPress caught up to these formats relatively recently. Native WebP support landed in version 5.8 back in July 2021. AVIF support arrived with WordPress 6.5 in April 2024. Now in 2026, both formats integrate smoothly with the Media Library, Gutenberg blocks, and most well-coded themes. The infrastructure exists, you just need to implement it correctly. And if you’re using a performance-optimized theme like DigiFlash, you’re already starting from a position of strength since the theme loads minimal CSS and no JavaScript by default.
WebP vs AVIF: Technical Differences Explained

Understanding what happens under the hood helps you make smarter optimization decisions. WebP uses a predictive coding algorithm based on VP8 video compression technology. It analyzes neighboring pixels to predict values, then encodes only the differences. This approach works exceptionally well for web graphics, illustrations, and images with large areas of solid color. WebP supports both lossy and lossless compression, transparency through an alpha channel, and even animation as a GIF replacement.
AVIF takes a different approach built on the AV1 video codec. AV1 was developed by the Alliance for Open Media, a consortium including Google, Mozilla, Apple, Microsoft, and Netflix. The codec uses more sophisticated compression techniques including intra-frame prediction, transform coding, and advanced entropy coding. In plain English: AVIF is smarter about identifying patterns in your images and compressing them more efficiently. The tradeoff is that encoding AVIF files requires more processing power and time.
Real-world compression tests tell the story clearly. In a test comparing the same photograph across formats, AVIF achieved a 50 percent smaller file size than WebP and 65 percent smaller than JPEG while maintaining similar visual quality. For a typical 500KB JPEG, that translates to roughly 175KB as WebP or 85KB as AVIF. Multiply those savings across every image on your site and the performance impact becomes significant. One client’s image-heavy homepage dropped from 8MB to under 2MB after converting to AVIF.
Browser support differs between the two formats, though the gap has narrowed considerably. WebP enjoys 95.29 percent global browser support according to caniuse.com data. AVIF sits at 93.8 percent. Both formats work in Chrome, Firefox, Safari, and Edge on their latest versions. AVIF gained Safari support in version 16, which means older Apple devices running iOS 15 or earlier won’t display AVIF images natively. This is exactly why fallback strategies matter. You serve AVIF to browsers that support it and WebP to everything else.
Decoding speed is another consideration. WebP decodes faster than AVIF in most browser implementations because the decoders have had more time to mature and optimize. On modern devices with fast processors, you won’t notice the difference. On older smartphones or low-powered tablets, AVIF’s heavier decoding requirements could theoretically offset some of the file size gains. In practice, the smaller file size almost always wins. Downloading less data over a slow connection matters more than a few extra milliseconds of CPU time on the client.
When to Use WebP, When to Use AVIF, When to Use Both

The blanket recommendation is simple: use AVIF as your primary format with WebP as the fallback. This approach gives you the best compression for browsers that support AVIF while maintaining compatibility with older browsers through WebP. But nuance exists, and understanding when each format excels helps you optimize more effectively.
Photography and complex images: AVIF dominates here. The format handles gradients, skin tones, and fine details better than WebP at equivalent file sizes. Product photography for eCommerce, portfolio images, travel blogs, and any content where image quality matters should prioritize AVIF. You’ll see the biggest file size reductions on these image types too. A high-resolution photograph that compresses to 400KB as WebP might hit 200KB as AVIF without visible quality loss.
Illustrations, logos, and graphics: WebP actually wins in some scenarios here. Testing showed WebP produced files 35 percent smaller than AVIF for simple non-photographic images. Icons, logos, diagrams, and illustrations with flat colors and sharp edges compress efficiently with WebP’s algorithm. If your site relies heavily on vector-style graphics converted to raster formats, WebP might be the better primary choice.
Screenshots and text-heavy images: Both formats handle these adequately, but WebP might still make sense for images where text sharpness is critical. Lossy compression can blur text slightly. If you’re creating tutorials or documentation with lots of UI screenshots, test your compression settings carefully. Sometimes a larger file size is worth it for legibility.
Animated content: WebP supports animation as a more efficient GIF replacement. AVIF also supports animation through animated sequences, though browser support and tooling are still catching up. For animated content, WebP remains the safer choice in 2026. You get smaller files than GIF with broader compatibility than AVIF animations.
The practical implementation uses HTML’s picture element to serve the right format automatically. Your WordPress optimization plugin handles this behind the scenes, detecting browser capabilities through the Accept header and serving AVIF when supported, WebP as fallback, and original JPEG/PNG as a final resort. You don’t need to manually create multiple versions of every image. The plugins do the conversion and the server or CDN handles the delivery logic.
Best WordPress Plugins for WebP and AVIF Conversion

Several plugins handle WebP and AVIF conversion well, each with different strengths. The right choice depends on your budget, technical comfort level, and specific needs. I’ll cover the major options with honest assessments of what works and what doesn’t.
ShortPixel consistently ranks among the top performers in compression quality tests. It achieved the best mobile PageSpeed score and best mobile LCP in comparative testing. The plugin offers both lossy and lossless compression with WebP and AVIF output. Pricing starts at $9.99 per month for unlimited images with 500GB CDN traffic, or you can buy one-time credit packages starting at $19.99 for 30,000 images. The credits never expire, which suits sites with occasional bulk optimization needs. ShortPixel also includes a global CDN that delivers converted images from edge servers worldwide.
Imagify comes from the same team behind WP Rocket and works perfectly if you’re already using their caching plugin. It tied for the best desktop PageSpeed score in testing and optimizes JPEGs particularly well. The free plan allows 20MB per month, roughly 200 images. Paid plans start at $5.99 per month for 500MB or $9.99 for unlimited. Imagify offers two levels of lossy compression, giving you more control over the quality-size tradeoff. The interface is clean and beginner-friendly.
EWWW Image Optimizer takes a unique approach by offering both cloud-based and local optimization. The free version uses your server’s resources to compress images using tools like jpegtran and optipng. This works well for sites on capable hosting but can strain shared hosting resources during bulk operations. The premium Easy IO service starts at $8 per month and offloads compression to EWWW’s servers while adding CDN delivery, automatic WebP/AVIF conversion, and lazy loading. EWWW’s support quality stands out. They respond to every ticket, even for free users.
Converter for Media deserves mention as the best free option for WebP conversion. The plugin has no limits on WebP conversion, which is remarkable for a free tool. AVIF conversion requires the pro version. The plugin stores converted images in a separate directory and implements automatic fallbacks through rewrite rules. If you’re on a tight budget and primarily need WebP, this plugin delivers without hidden costs. Users report successfully converting 90 percent of their image archives to WebP without paying anything.
Smush has over a million active installations and a 4.8/5 rating, but the pricing model differs significantly from competitors. WebP and AVIF conversion requires Smush Pro, which is only available as part of a WPMU DEV membership, which starts at $15 per month (or $6/month promotional for the first year) for a single site, going up to $100/month for unlimited sites. As a standalone image optimizer, cheaper options exist. But if you’re already paying for WPMU DEV, Smush Pro handles optimization competently.
Step-by-Step WordPress Image Optimization Setup

Implementing proper image optimization involves more than just installing a plugin. Follow this workflow to maximize your results and avoid common pitfalls that can actually hurt performance.
Audit your current images first. Before converting anything, understand what you’re working with. Run PageSpeed Insights on your key pages and note which images appear in the LCP element diagnostics. Use Query Monitor or your browser’s developer tools to see actual image file sizes being loaded. Many sites have images uploaded at 4000 pixels wide when they’re displayed at 800 pixels. Resizing before compression yields better results than compression alone. If you’re already working on site speed optimization, image handling should be near the top of your list.
Choose your plugin and configure settings. For most sites, I recommend ShortPixel or Imagify. Install your chosen plugin and configure the compression level. Start with “lossy” or “aggressive” compression and check the visual results. If quality is acceptable, stick with it. If you see artifacts on important images, dial back to “glossy” or “medium” settings. Enable both WebP and AVIF output formats with automatic browser detection.
Run bulk optimization on existing images. Most plugins include a bulk optimization feature that processes your entire Media Library. This can take hours on sites with thousands of images. Run it during off-peak hours to avoid stressing your server during high-traffic periods. ShortPixel and EWWW process images on their servers, which is gentler on your hosting. Converter for Media processes locally, so monitor your server resources.
Configure lazy loading correctly. WordPress has included native lazy loading since version 5.5. The loading=”lazy” attribute is automatically added to images with width and height attributes. However, you should exclude above-the-fold images from lazy loading to avoid hurting LCP. WordPress 5.9 automatically skips the first image on each page, but this isn’t always accurate. Plugins like WP Rocket and Perfmatters let you exclude specific images or CSS selectors from lazy loading.
Set up a CDN for delivery. A content delivery network serves your images from edge servers geographically closer to your visitors, and our WordPress CDN setup guide walks through the full configuration. This reduces latency and improves LCP regardless of image format. Many image optimization plugins include CDN functionality. Cloudflare’s free tier works well for most sites and their paid APO feature adds WordPress-specific optimizations. ShortPixel and EWWW both include CDN delivery in their premium plans, eliminating the need for a separate service.
Verify everything works. After setup, clear all caches and test your pages. Check the Network tab in browser developer tools to confirm WebP or AVIF images are being served. The Content-Type header should show image/webp or image/avif. Run PageSpeed Insights again and compare the LCP scores to your baseline. A properly optimized site should show dramatic improvements in the “Serve images in next-gen formats” and “Properly size images” diagnostics.
Common Mistakes That Hurt Image Performance

I’ve audited hundreds of WordPress sites and the same image-related mistakes appear repeatedly. Avoiding these issues can be as impactful as implementing optimization in the first place.
Lazy loading the LCP image. This is the most common performance killer I see. If your hero image or featured image is the LCP element and it’s lazy loaded, the browser waits until that area scrolls into view before fetching it. That wait time directly adds to your LCP score. Always exclude above-the-fold images from lazy loading. Check your pages with the Lighthouse “Largest Contentful Paint element” diagnostic to identify exactly which image needs priority loading.
Not specifying width and height attributes. When images lack dimensions, the browser can’t allocate space until the image downloads. This causes layout shifts as content jumps around during loading, hurting your Cumulative Layout Shift score. Modern WordPress adds dimensions automatically to images in the Media Library, but images added through custom code or page builders often lack them. Always include width and height attributes, even if you’re using CSS to control displayed size. The aspect ratio is what matters for preventing layout shift.
Using oversized source images. Compressing a 4000 pixel wide image down to 200KB doesn’t help if it displays at 400 pixels. The browser still downloads the full file and scales it down. WordPress generates multiple image sizes during upload (thumbnail, medium, large), but many themes don’t use responsive image markup correctly. Enable “resize larger images” in your optimization plugin to cap upload dimensions at a reasonable maximum like 2048 pixels.
Ignoring CSS background images. Most image optimization plugins only process images in the Media Library. Background images defined in CSS escape optimization entirely. If your theme uses large background images, you’ll need to manually optimize these or use a plugin like Perfmatters or Asset CleanUp that can handle CSS backgrounds. This is another reason why using a performance-focused block theme matters. They typically avoid heavy CSS backgrounds in favor of optimized block-based layouts.
Stacking multiple optimization plugins. Running ShortPixel and Imagify simultaneously doesn’t give you double the optimization. It creates conflicts and can actually produce larger files as one plugin re-compresses the output of another. Pick one image optimization plugin and stick with it. If you’re not satisfied with results, deactivate and uninstall the first plugin completely before trying another.
Lazy loading tiny images. The overhead of lazy loading scripts isn’t worth it for images under 10KB. Small icons, thumbnails, and decorative elements should load normally. Most optimization plugins let you set a minimum file size threshold for lazy loading. Configure this appropriately to avoid adding JavaScript overhead for images that would load almost instantly anyway.
Take Action: Your Next Steps for Faster Images
Image optimization isn’t a one-time task. Every new upload needs proper handling, and algorithm updates may change what works best over time. But the foundation you build now will serve you well. AVIF and WebP together provide a reliable solution that works across browsers while delivering the smallest possible file sizes without visible quality loss.
Start by running PageSpeed Insights on your most important pages and identifying your current LCP scores. Note which images are causing issues. Then choose an optimization plugin based on your budget and needs. ShortPixel offers the best compression results, Imagify provides the easiest setup, and Converter for Media works well for free WebP conversion. Whichever you choose, enable both AVIF and WebP output with automatic browser detection.
The combination of next-gen image formats, proper lazy loading configuration, and a performance-optimized theme creates compound benefits. Consider pairing your optimization efforts with security best practices to build a WordPress site that’s both fast and protected. Each improvement builds on the others. What questions do you have about implementing WebP and AVIF on your WordPress site? Have you tested different compression plugins and found one that works particularly well for your use case?


0 Comments on "WordPress Image Optimization: WebP vs AVIF Performance Guide for 2026"